
Introduction
A patio without plants is just a slab of concrete or wood. But add a thoughtfully styled plant shelf — layered with trailing greenery, terracotta pots, and seasonal blooms — and suddenly that same space feels like a private garden sanctuary. It is one of those simple outdoor upgrades that delivers results completely disproportionate to the effort and cost involved.
Outdoor plant shelf ideas have absolutely exploded in popularity, and honestly, it makes perfect sense. Whether you are working with a sprawling wraparound porch, a compact apartment balcony, or a narrow side yard, a vertical plant display lets you grow more greenery in less floor space. It draws the eye upward, adds architectural structure, and brings the lushness of a garden into even the smallest outdoor areas.
I have spent years styling patios, balconies, and outdoor living spaces, and plant shelving consistently ranks as one of the highest-impact changes you can make outdoors. One well-styled shelf can turn a flat, forgettable wall into the kind of backdrop that makes people stop scrolling on Pinterest.
The twelve ideas in this guide cover every style, every budget, and every outdoor space size. From rustic reclaimed wood to sleek modern metal, from corner-maximizing towers to charming repurposed ladders — there is something here that will work for your space and your personality.
Key Takeaways
- Vertical plant shelving maximizes greenery in small spaces without sacrificing floor area
- The best plant shelves combine different heights, textures, and pot styles for visual depth
- Material matters — always choose weather-resistant finishes for outdoor use
- Grouping plants in odd numbers (3, 5, 7) creates a more natural, designer look
- Trailing plants on upper shelves and upright plants on lower ones create balanced compositions
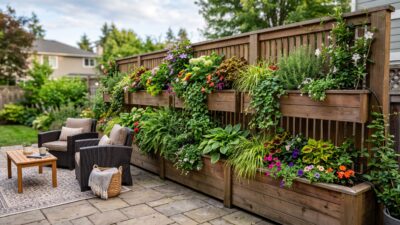
- A plant shelf works as both a privacy screen and a decorative feature simultaneously
- Most of these ideas are beginner-friendly and DIY-accessible
Why Outdoor Plant Shelving Works So Well
Before the ideas, a quick word on why plant shelves outperform almost every other outdoor styling upgrade. The answer comes down to three things: verticality, versatility, and visual impact.
Most patios are designed horizontally — furniture sits flat, plants sit on the ground, and the whole arrangement lives in one plane. A plant shelf immediately breaks that. It introduces height, creates layers, and gives the eye somewhere new to travel. Suddenly the space feels richer, more intentional, and more like a designed garden room than a functional outdoor area.
Shelves also let you grow significantly more plants in the same footprint. A floor-to-ceiling plant tower occupying two square feet of floor space can display twelve to fifteen pots. That same number of plants arranged on the ground would consume most of a small balcony.
And practically speaking, plant shelves are one of the most affordable outdoor upgrades available. A simple timber shelf bracket, a couple of planks, and five or six pots can transform a blank wall for well under fifty dollars.
1. Reclaimed Wood Ladder Shelf
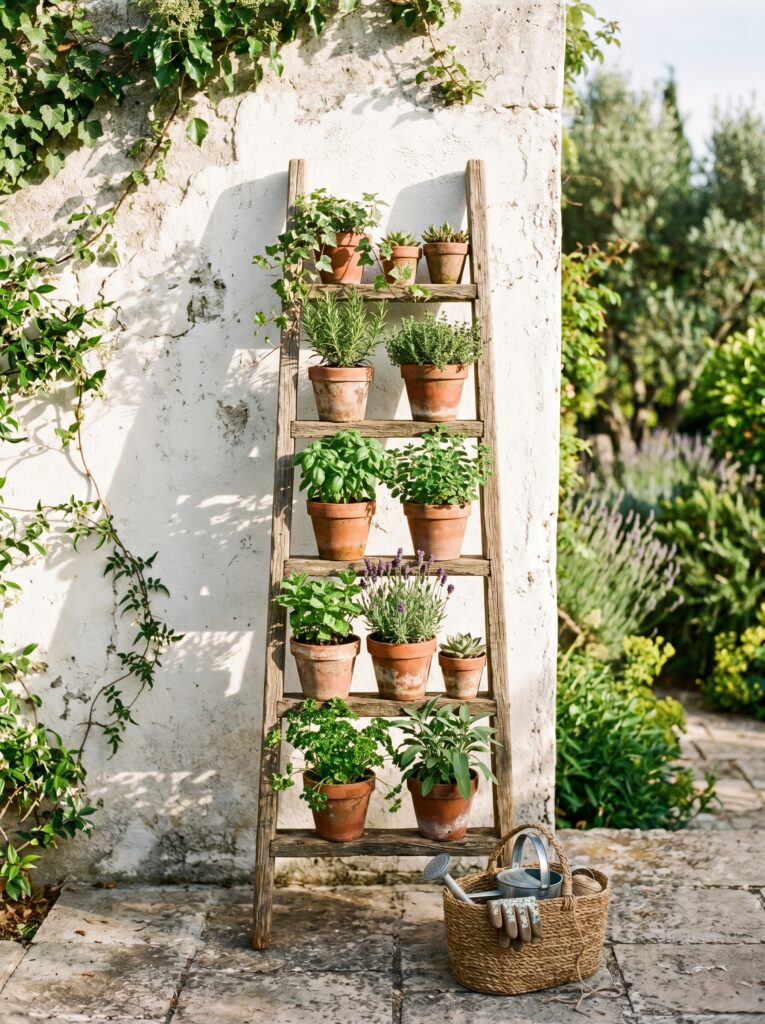
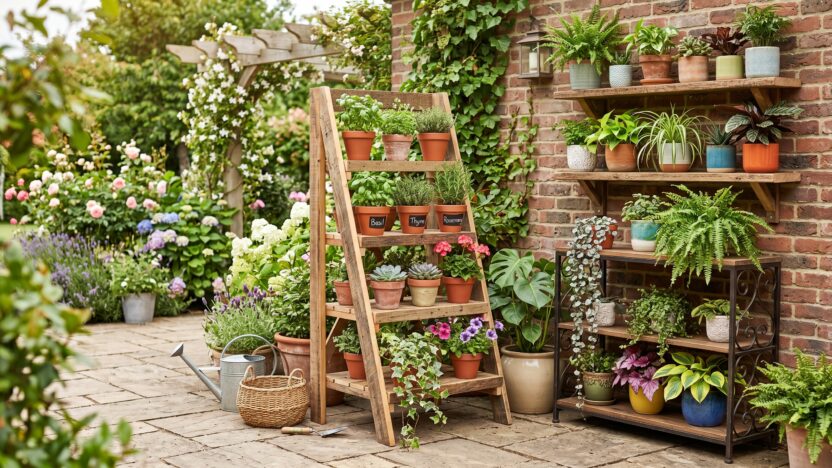
A leaning ladder shelf is one of the most popular patio plant displays for good reason — it is freestanding, moveable, completely commitment-free, and looks gorgeous the moment you lean it against a wall. The reclaimed timber version adds warmth, texture, and a lived-in quality that painted or plastic alternatives simply cannot replicate.
Key Elements:
- A reclaimed timber ladder (salvage yard, estate sale, or purpose-built ladder shelf)
- Terracotta pots in graduating sizes — largest at the base, smallest at the top
- A mix of trailing plants (string of pearls, ivy, creeping jenny) for upper rungs
- Upright herbs (basil, rosemary, thyme) or succulents for mid and lower rungs
- A woven basket or wooden crate at the base for visual grounding
- Natural jute or twine accessories for a cohesive rustic palette
- A waterproof wood sealant or oil to protect the timber outdoors
How to Style It:
- Lean the ladder at a slight angle against the wall — approximately 10–15 degrees — for both stability and aesthetic ease.
- Start placing the largest, heaviest pots on the bottom two rungs to anchor the composition visually.
- Work upward with progressively smaller pots, placing trailing plants on the top two rungs so foliage cascades downward.
- Vary pot materials — terracotta, glazed ceramic, and woven basket pots together look richer than all-matching sets.
- Tuck a few smaller accent pieces between pots: a small lantern, a smooth stone, a vintage garden label.
- Step back after styling and remove anything that feels cluttered — negative space is as important as the plants themselves.
- Seal or oil the timber each spring to maintain the wood’s condition in outdoor weather.
In my experience, a reclaimed ladder shelf is one of those pieces that looks like it cost a fortune but often comes from a second-hand shop for almost nothing. The styling does all the work.
2. Floating Wall-Mounted Timber Shelves
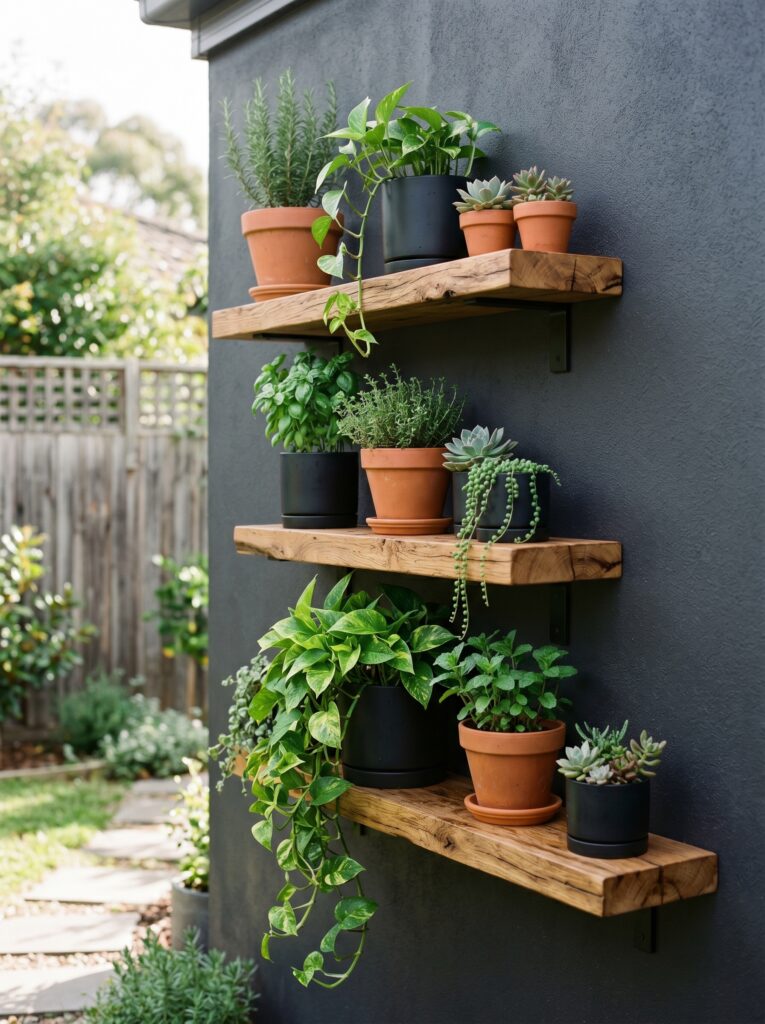
Wall-mounted floating shelves bring a clean, architectural quality to an outdoor space that freestanding options cannot quite match. When staggered at different heights — not simply lined up in parallel — they create a dynamic, gallery-style display that looks intentional and considered. This is the approach interior designers use indoors, and it translates beautifully outside.
Key Elements:
- Solid timber shelves with heavy-duty outdoor-rated wall brackets
- Waterproof timber stain or exterior paint finish (charcoal, black, or natural cedar work well)
- Variation in shelf lengths — one longer shelf and two shorter ones creates visual interest
- Matte black or terracotta pots for a contemporary palette
- A mix of plant heights: tall upright plants on wider shelves, trailing plants on narrower shelves
- Exterior-grade screws and wall anchors appropriate for your wall material
- At least 10–12 inches of shelf depth to accommodate standard pot sizes comfortably
How to Style It:
- Plan the shelf arrangement on paper first — sketch the wall and mark positions before drilling.
- Offset shelves horizontally rather than stacking them in a straight vertical line.
- Leave at least 12–14 inches of vertical space between shelves so plants have room to grow upward.
- Mount the highest shelf first, then work downward — this makes alignment much easier.
- Group pots in odd numbers (three per shelf works beautifully) with varying heights within each group.
- Choose a cohesive pot palette — two to three colors maximum per shelf arrangement.
- Add one non-plant element per shelf: a small candle lantern, a ceramic bird, or a smooth stone to add personality.
3. Black Metal Tiered Plant Stand
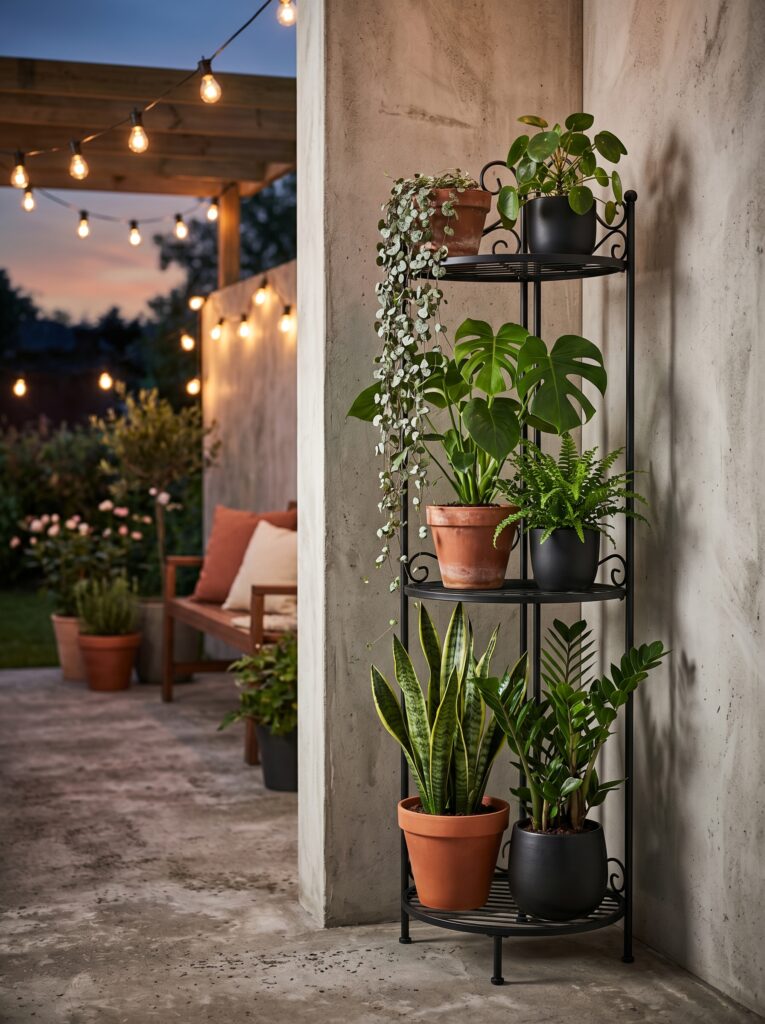
Black metal tiered plant stands are having a serious moment in outdoor design, and they deserve every bit of the attention. The dark matte finish pops against green foliage in a way that feels contemporary and editorial. They are slim, lightweight, easy to move around the patio, and surprisingly affordable. For renters or anyone who cannot drill into walls, they are an ideal solution.
Key Elements:
- Powder-coated black metal frame (rust-resistant coating is non-negotiable for outdoor use)
- Three to five tiers for maximum planting capacity in minimal floor space
- Terracotta and matte black pot combination for a warm contemporary palette
- A large statement plant at the base: snake plant, small fiddle-leaf fig, or large succulent
- Mid-tier trailing or arching plants: string of hearts, pothos, or spider plant
- A small delicate trailing plant at the top to spill downward
- Non-slip feet pads on the base to prevent scratching on decking or tiles
How to Style It:
- Position the stand in a corner or against a wall to maximize the visual impact of its height.
- Anchor the composition with the largest, most structural plant at the very base.
- Select mid-tier plants that arc or trail slightly rather than growing rigidly upright.
- Place the most delicate, trailing plant on the top tier so its foliage cascades downward through the levels.
- Rotate all plants a quarter turn each week so every side receives even sunlight.
- Keep the color palette of pots consistent — no more than two or three complementary tones.
- Add one candle lantern or small string of solar lights wrapped around the stand frame for evening ambiance.
4. Cinder Block and Timber Shelf Stack
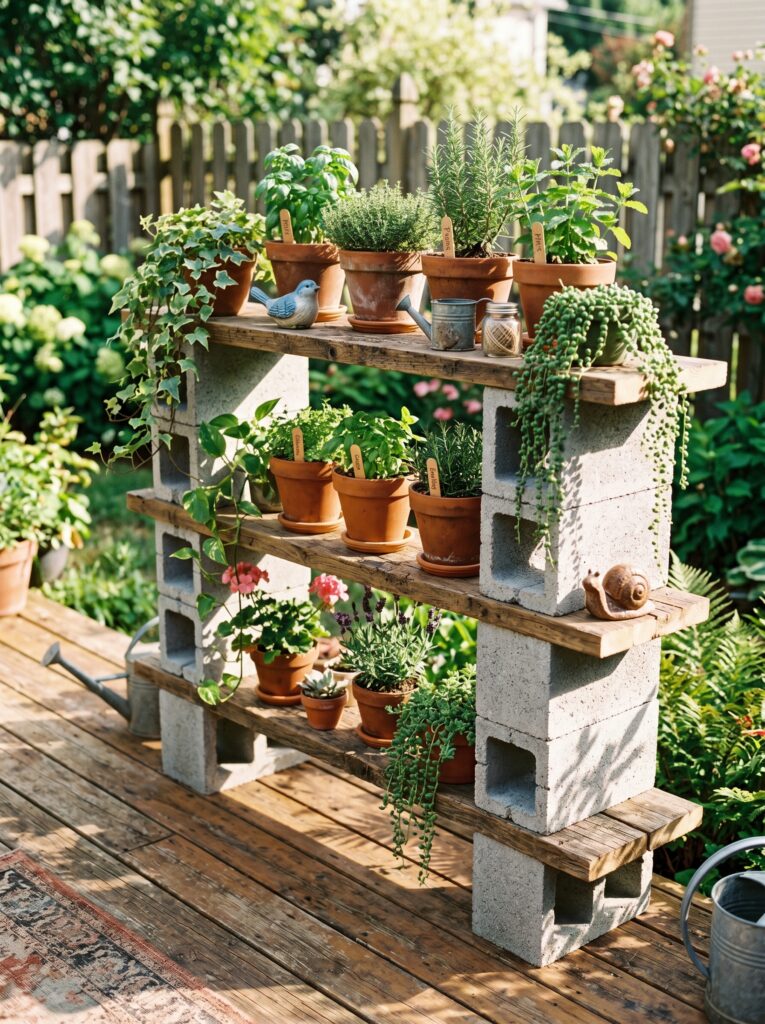
This is the budget-friendly outdoor shelving idea that quietly delivers designer results. Cinder blocks and timber planks — the classic combination — are incredibly versatile, structurally solid, and endlessly rearrangeable. Stack them differently, paint the blocks, use different timber widths, and the whole look changes. It is genuinely one of the most cost-effective patio plant displays you can build in an afternoon.
Key Elements:
- Standard concrete cinder blocks (available at any hardware store for under two dollars each)
- Reclaimed or new timber planks cut to desired shelf width
- Optional: chalk paint or masonry paint in a matte finish to color the blocks
- A large collection of terracotta herb pots for the top shelves
- Trailing plants in hanging or elevated positions for visual flow
- A level surface beneath the build — essential for structural safety
- Outdoor rug or decking beneath to define the shelf area as a styled zone
How to Style It:
- Plan the height and shelf count before buying materials — sketch a simple layout.
- Place two cinder blocks side by side at the base, then lay a timber plank across them.
- Stack additional blocks on top of the plank and repeat for each shelf level — two to four levels works well.
- Check that each level is plumb and even before adding weight.
- Paint the blocks if desired — charcoal, white, and terracotta are all beautiful choices.
- Style each shelf level with two to four pots, varying the heights within each level.
- Anchor the structure against a wall if building more than three levels high.
I’ve tried this cinder block shelf approach on a rental patio, and it was genuinely the most-commented feature in that space. It looks far more deliberate and stylish than the budget suggests.
5. Hanging Wall Pocket Planter
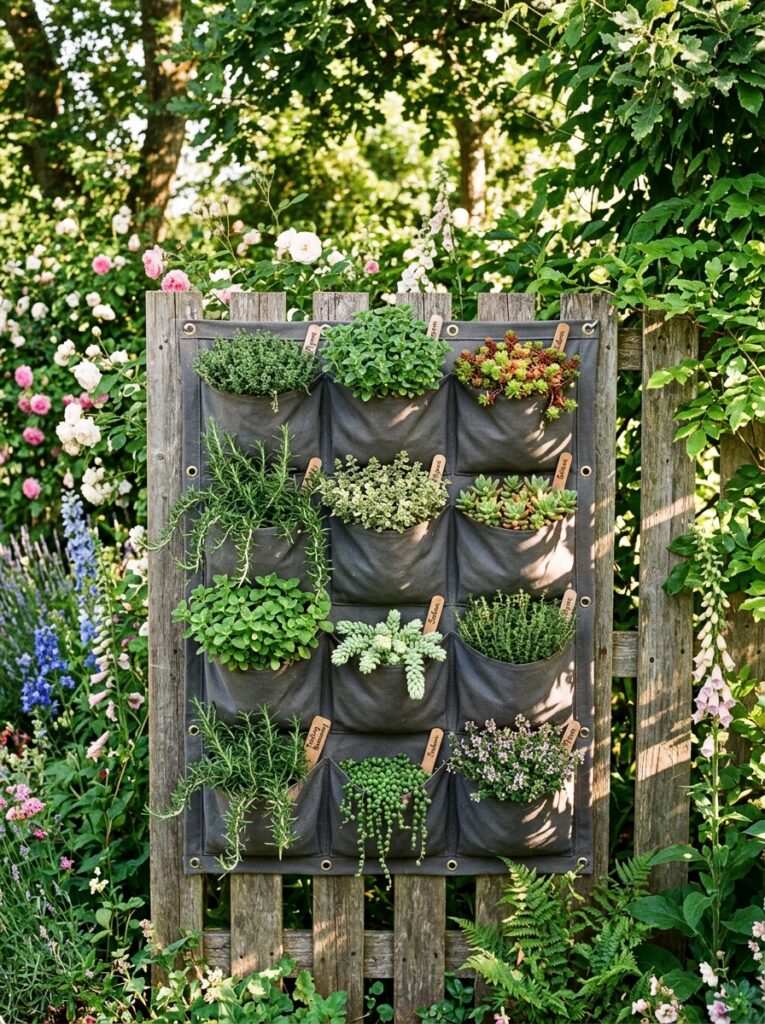
Wall pocket planters are the ultimate small-space plant display solution. They mount flat against a fence or wall, add almost no depth to the space, and yet can hold ten to fifteen individual plants in the footprint of a single large pot. They are especially popular for edible gardens — herbs in a wall pocket planter are accessible, beautifully displayed, and practical all at once.
Key Elements:
- Heavy-duty outdoor fabric or felt pocket planter (UV-resistant for longevity)
- Alternatively: repurposed shoe organizer pockets in weather-resistant fabric
- A south or west-facing fence for maximum sunlight exposure
- Herbs: basil, parsley, chives, thyme, oregano, and mint for an edible wall
- Succulents and sedums as drought-tolerant, low-maintenance alternatives
- Drip irrigation inserts or a watering can with a fine nozzle for regular watering
- A waterproof backing barrier on the wall or fence surface behind the planter
How to Style It:
- Mount the pocket planter at eye height so individual pockets are easily accessible for watering and harvesting.
- Fill each pocket with a quality outdoor potting mix blended with perlite for drainage.
- Plant taller or more upright herbs in the upper pockets and trailing varieties in the lower pockets.
- Stagger plant types so contrasting textures and leaf shapes sit adjacent to each other.
- Water thoroughly at installation — pockets can be slow to absorb water initially.
- Check moisture levels daily in hot weather; pocket planters dry out faster than conventional pots.
- Replace any underperforming plants seasonally — a full, lush pocket wall is the goal.
6. Tiered Terracotta Pot Tower
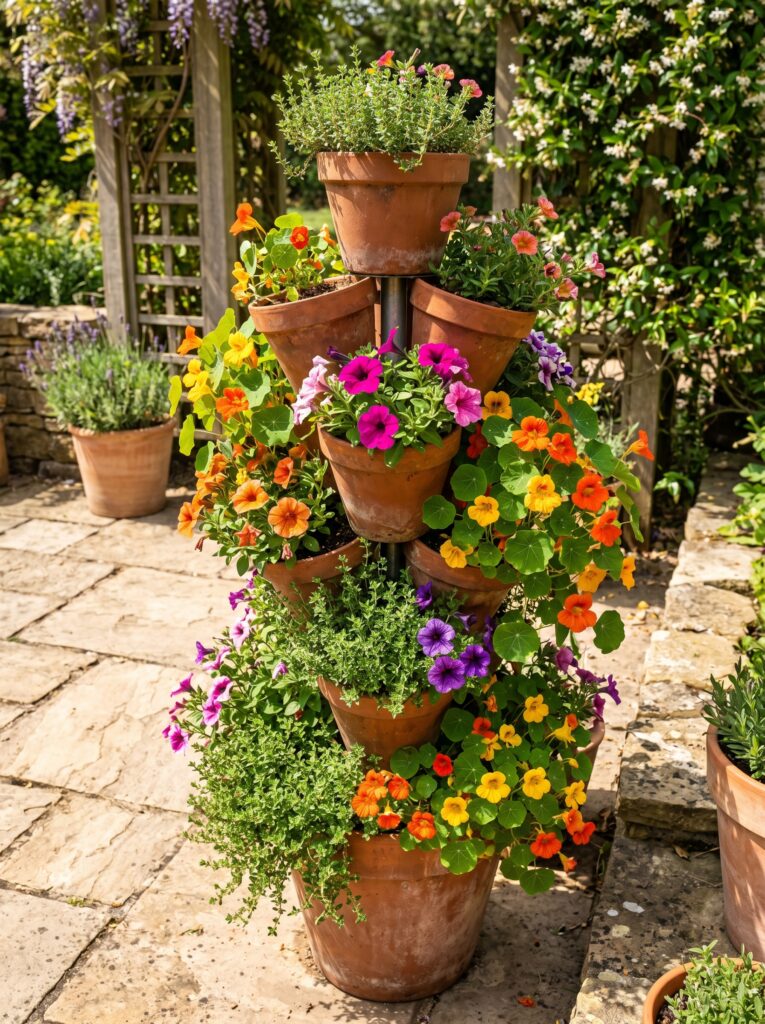
A stacked terracotta pot tower is one of those outdoor plant features that looks complex but is genuinely beginner-friendly to build. The concept is simple: stack terracotta pots of descending sizes on a central post or pipe, planting each layer with trailing or cascading plants. The result — a column of cascading color — is spectacular from mid-season onward when plants fill in.
Key Elements:
- Five to seven terracotta pots in graduating sizes (largest at base, smallest at top)
- A central metal pipe or sturdy wooden dowel threaded through the drainage holes
- Fast-draining potting mix blended with horticultural grit for each pot
- Trailing and cascading plants: petunias, nasturtiums, trailing thyme, or lobelia
- A large, heavy base pot filled with concrete or gravel for structural stability
- Outdoor-rated sealant on the inner base to slow terracotta moisture loss
- A position in full sun — cascading flowers need maximum light to thrive
How to Style It:
- Drive a central metal pipe 12 inches into the ground or anchor it in a large base pot filled with concrete.
- Thread the largest pot onto the pipe first and fill with growing medium.
- Add each progressively smaller pot, rotating it slightly off-center from the one below for a more natural, spiraling look.
- Plant two to three cascading plants in each pot layer, directing stems outward immediately.
- Water from the top — water will trickle through each layer if the growing medium is well-drained.
- Position the tower where it can be seen from multiple angles — this is a 360-degree feature.
- Deadhead flowers regularly throughout the season to keep the display lush and continuously blooming.
7. Repurposed Wooden Crate Shelves
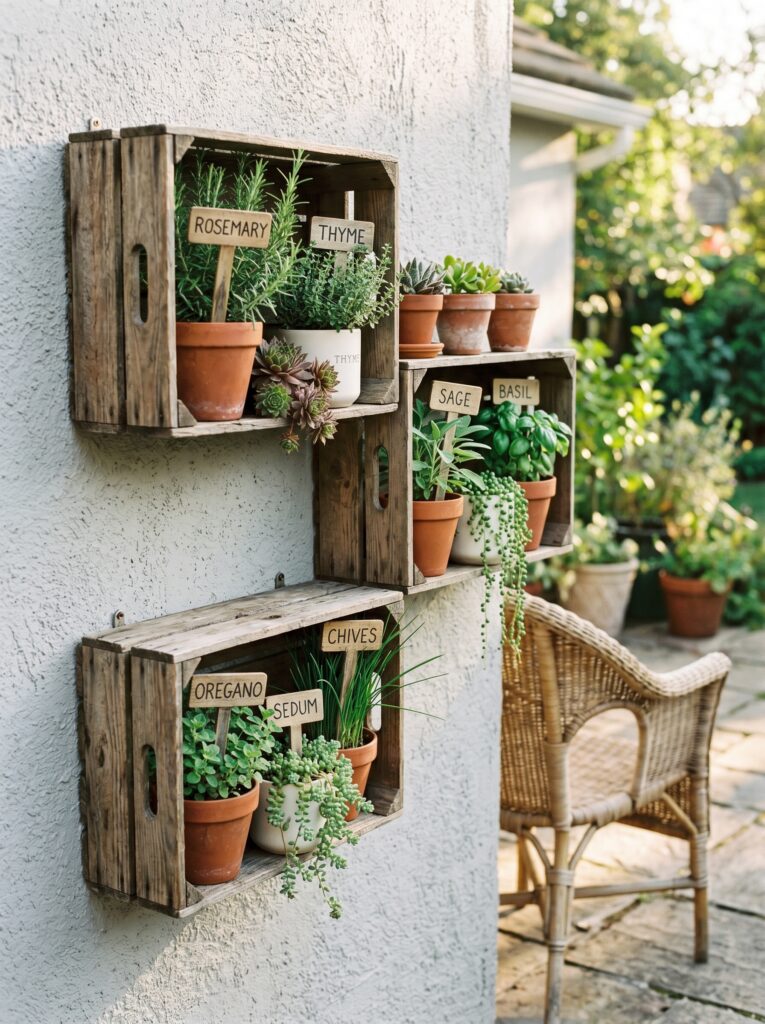
Wooden crates — the kind used for wine, fruit, or produce — make some of the most charming and affordable outdoor plant shelves imaginable. Wall-mounted horizontally, each crate becomes a shadow box planter that holds two or three pots. Arrange three to five in a staggered pattern and you have a styled, gallery-quality plant wall that feels collected and personal rather than purchased as a set.
Key Elements:
- Timber produce or wine crates (salvage yards, markets, or grocery stores)
- Heavy-duty D-ring hooks and picture wire for wall mounting
- Waterproof wood stain or exterior paint in a consistent palette
- A mix of small terracotta and white ceramic pots to fill each crate
- Herbs, small succulents, or compact trailing plants suited to the crate depth
- Vintage-style garden label stakes or small chalkboard signs for a charming touch
- A layer of gravel or coconut coir liner inside each crate for drainage
How to Style It:
- Sand any rough edges on salvaged crates and apply a waterproof wood stain — all in the same finish for cohesion.
- Drill two hanging holes in the back of each crate and attach D-ring hooks.
- Plan the wall arrangement on the floor first — photograph it before hanging to use as a reference.
- Mount the crates in a staggered pattern rather than a straight grid for a more organic feel.
- Line the interior of each crate with a thin gravel layer before placing pots.
- Style each crate with two or three pots of slightly different heights.
- Add a small decorative detail to one or two crates: a miniature watering can, a folded garden tag, or a smooth river stone.
8. Corner Etagere Plant Stand
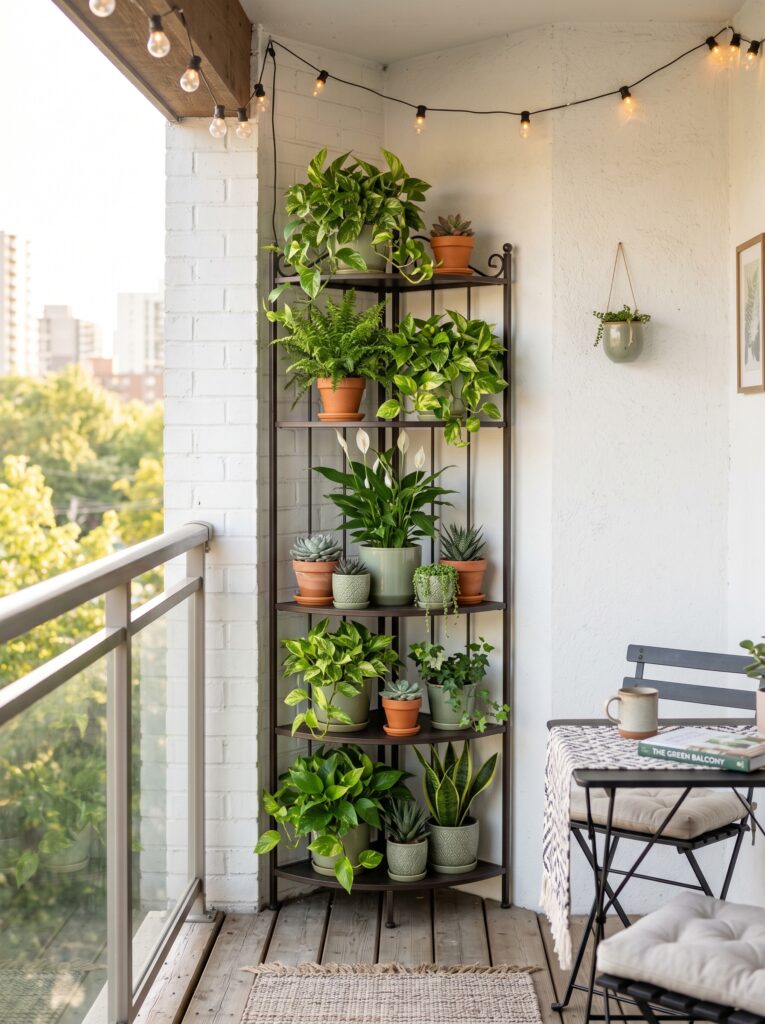
Corner space is often the most wasted real estate on any patio or balcony. A corner etagere — a slim, triangular or angled multi-tier stand designed specifically to fit into corners — solves this completely. It slots neatly into an unused corner and suddenly holds eight to twelve plants in a footprint smaller than a single armchair.
Key Elements:
- A corner-specific etagere or slim angled plant stand (metal or timber)
- Weather-resistant finish: powder-coated steel or sealed timber
- A mix of shade-tolerant plants if the corner receives limited direct sun
- Pothos, ferns, peace lily, or philodendron for shadier corner positions
- Succulents and herbs if the corner receives good natural light
- Pots in a consistent material or color palette — maximum three tones
- A solar-powered fairy light string draped through the tiers for evening warmth
How to Style It:
- Measure the corner depth and width before purchasing — not all etageres fit the same corner angles.
- Position the stand so the widest or tallest tier faces outward into the patio space.
- Place the largest, most structural plant at the base and work upward with decreasing plant sizes.
- Include at least one trailing plant that will spill over the edge of a mid or upper tier.
- Keep the pot palette cohesive — three terracotta, three matte white, and two earthy green ceramics work beautifully together.
- Weave a small string of solar fairy lights through the upper two tiers for evening ambiance.
- Rotate the stand a quarter turn monthly to ensure all plants receive even light exposure.
A helpful styling trick is to treat a corner etagere like a small indoor bookshelf — style it with intention, include a few non-plant objects, and leave a little breathing room between pieces.
9. Bamboo Shelf Divider Screen
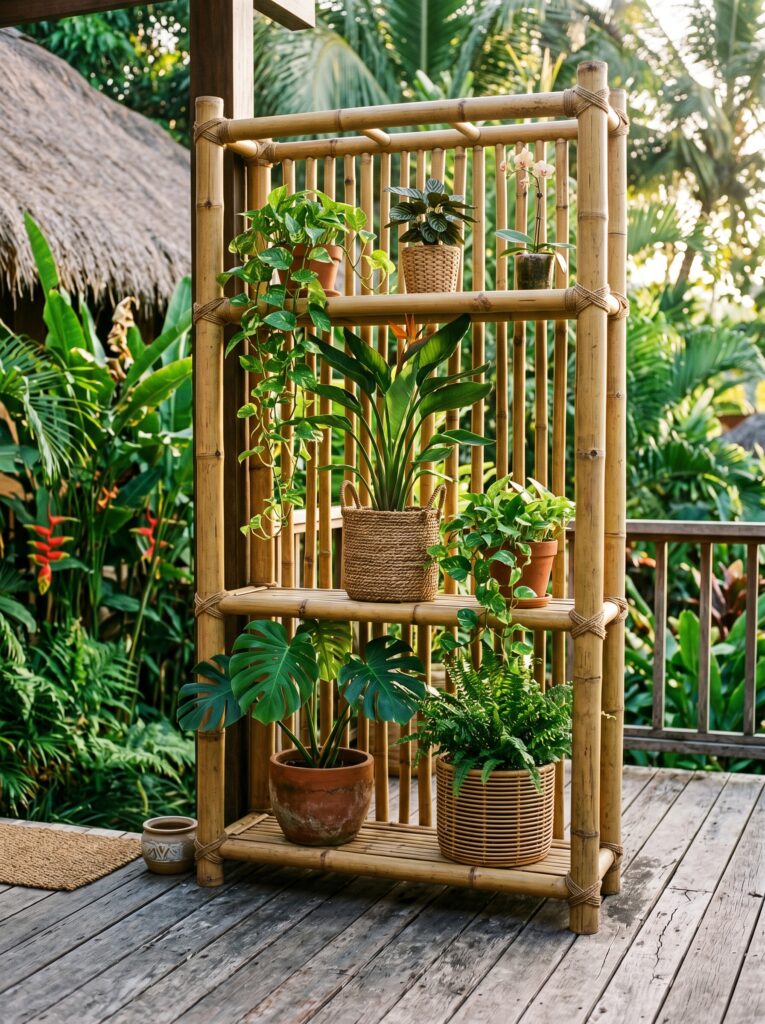
A bamboo shelf divider does two jobs beautifully: it creates privacy between outdoor spaces and displays plants at the same time. The natural warmth of bamboo complements green foliage perfectly, and the built-in shelf structure means you can carry significant planting without the visual heaviness of a solid fence or wall. This is particularly effective on decks and patios that are overlooked by neighbors.
Key Elements:
- A freestanding bamboo frame with integrated horizontal shelf runners
- Natural bamboo finish or a warm wood stain to match the deck
- Large tropical plants for the lower and mid shelves: monstera, bird of paradise, peace lily
- Trailing plants for upper shelf positions
- Rattan and terracotta pot combination for a warm, organic palette
- Furniture-grade casters on the base for easy repositioning
- Bamboo or natural twine for any additional plant training details
How to Style It:
- Position the bamboo divider perpendicular to the main sightline you want to screen.
- Anchor freestanding shelves with furniture casters locked in position or weighted base pots.
- Place the largest, most visually impactful plants on the mid shelves at natural eye height.
- Use the upper shelf for trailing plants that soften the top edge of the divider.
- Keep the lower shelf for larger, heavier pots that anchor and stabilize the structure.
- Group plants in odd numbers per shelf for the most natural aesthetic.
- Water more frequently during hot months — bamboo shelves in full sun dry out faster than shelved-against-wall alternatives.
10. Rustic Wooden Crate Stack Tower
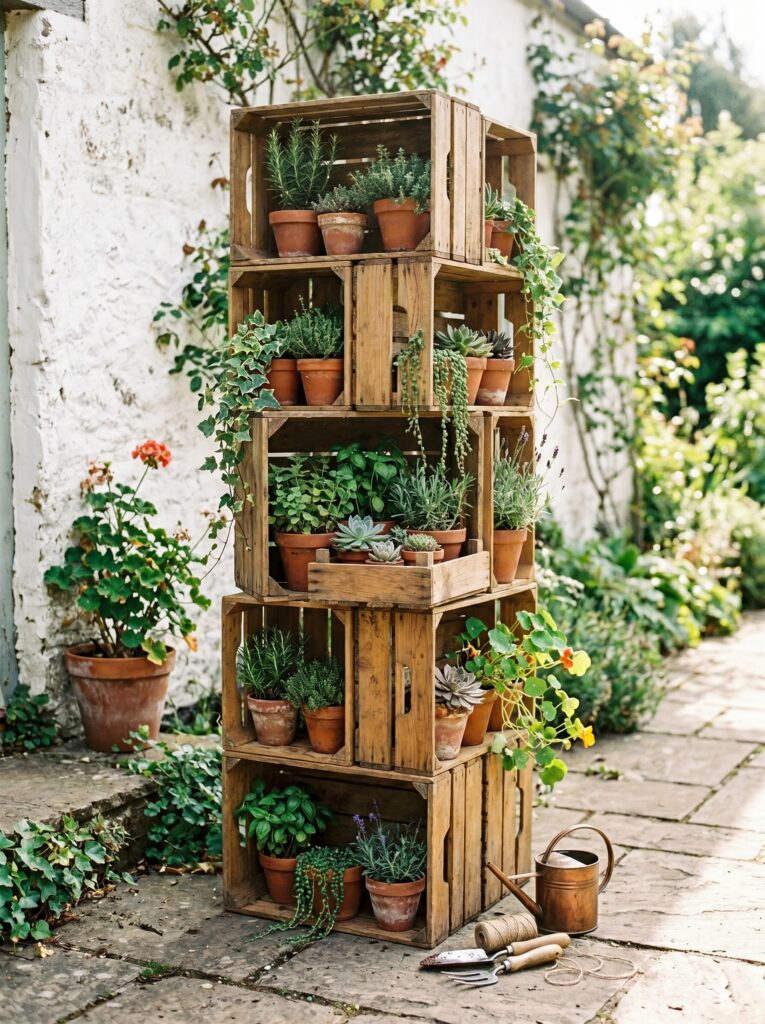
Stacking wooden crates in an offset zigzag pattern creates one of the most visually interesting plant towers you can build — and it requires no tools, no drilling, and no permanent fixing. Simply alternate the direction of open-front crates as you stack them, creating a honeycomb of planting pockets that looks intentional and architectural.
Key Elements:
- Open-front timber crates in uniform size (wine crates or produce boxes work perfectly)
- Waterproof wood stain or paint in a consistent finish across all crates
- Terracotta pots in a consistent size range that fits comfortably inside each crate opening
- A mixture of upright and trailing plants to vary the silhouette at each level
- Ground-level stability from a weighted base crate filled with a heavy pot
- No hardware needed — weight and friction hold the structure in place at three to four levels
- A wall or fence to lean the tower against for taller builds
How to Style It:
- Treat all crates with the same waterproof stain before building — consistency is the key to a polished result.
- Place the heaviest, largest pot inside the bottom crate to anchor the base.
- Stack the second crate rotated 90 degrees from the first, opening facing a different direction.
- Continue alternating direction with each level — this creates the offset, zigzag effect.
- Limit freestanding builds to four levels without wall support for safety.
- Style each opening with one or two pots and a small accent piece — a stone, a label, a small figure.
- Step back and adjust any pots that look overcrowded — each crate opening should feel balanced, not stuffed.
11. Painted Peg Rail Planter
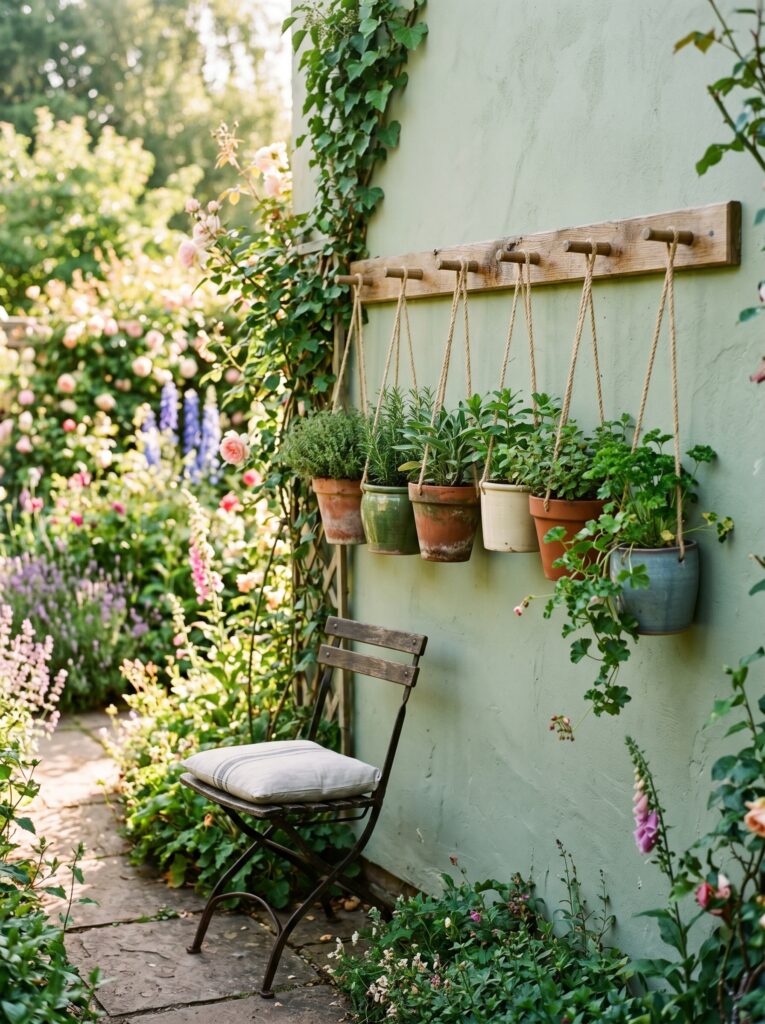
A peg rail — the simple Shaker-inspired rail with wooden pegs — might be the most underrated outdoor plant display system available. It is inexpensive, takes minutes to install, and allows you to hang pots at varying heights for a beautifully layered, bohemian look. The natural rope and terracotta combination against a painted wall is one of those classic pairings that photographs beautifully and looks even better in person.
Key Elements:
- A timber peg rail (Shaker-style, 36–48 inches long, with five to seven evenly spaced pegs)
- Exterior paint finish on both the rail and the wall behind for a cohesive look
- Natural jute or macramé rope for hanging pot holders
- Terracotta and natural ceramic pots sized proportionally to the rope holders
- Trailing plants: string of pearls, ivy, creeping jenny, trailing rosemary
- Wall-mount screws appropriate for the wall material behind (masonry anchors for brick or render)
- A consistent rope length variation — alternate between 6-inch and 12-inch drop lengths for rhythm
How to Style It:
- Mount the peg rail at approximately shoulder height so hanging pots fall within comfortable reach for watering.
- Use masonry anchors or heavy-duty wall plugs appropriate for the wall behind — a pot-laden rail is heavier than it looks.
- Cut rope lengths before hanging — plan alternating long and short drops for visual rhythm.
- Thread rope through terracotta drainage holes and knot securely, or use macramé pot holders looped over each peg.
- Choose trailing plant varieties predominantly — they look most effective when hanging.
- Add one upright herb or small potted succulent at the shortest drop position for contrast.
- Paint the wall behind the rail in the same color as the rail itself for a seamless, built-in look.
12. Greenhouse-Style Shelving Unit
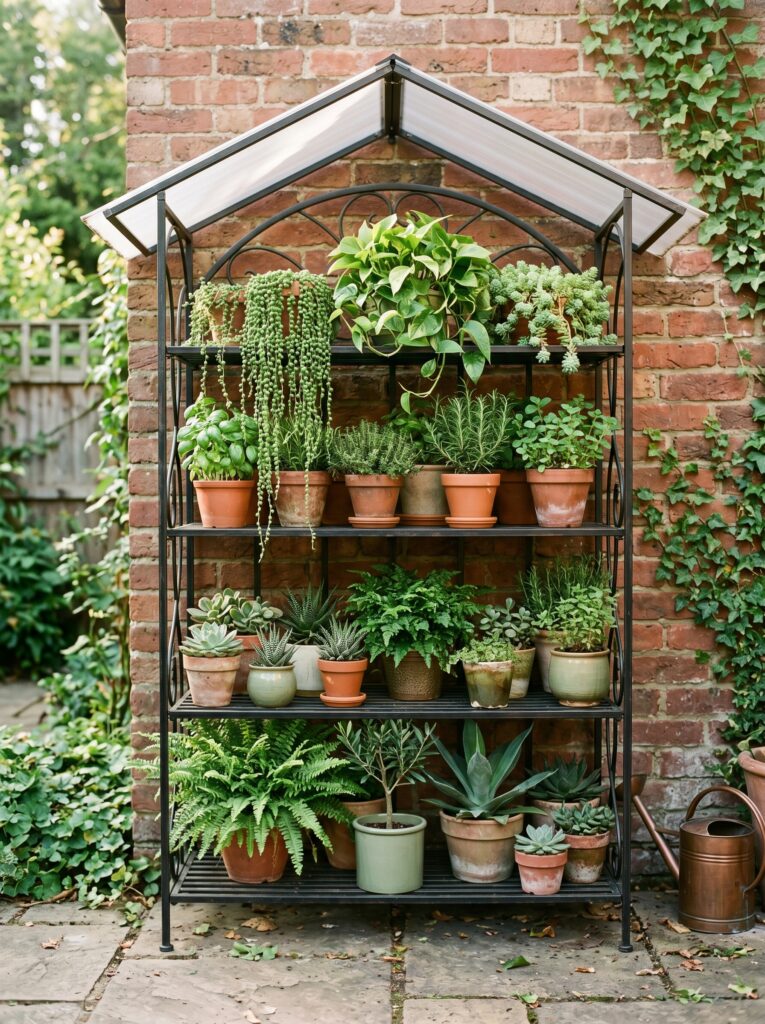
A greenhouse-style outdoor shelving unit — the kind with a clear polycarbonate or glass roof panel — offers something none of the other shelf styles can: weather protection for your plants. The covered top shields sensitive plants from frost, heavy rain, and harsh sun, extending the growing season and opening up the range of plants you can successfully display outdoors. For plant enthusiasts in climates with unpredictable weather, this is a genuinely practical and beautiful solution.
Key Elements:
- A powder-coated steel or aluminum shelving frame with clear cover panel
- Four to five shelves with adjustable spacing for varying plant heights
- Ventilation openings or a zippered front panel for airflow in warm months
- A mix of seasonal and year-round plants: herbs, ferns, begonias, and succulents
- Terracotta and ceramic pots in warm tones to complement the metal frame
- A drip tray system on each shelf to prevent water damage to lower plants
- Positioning against a wall for wind protection and heat retention
How to Style It:
- Position the unit against a south or west-facing wall for maximum light and warmth.
- Use the top shelf for plants that need the most light — herbs, succulents, and sun-loving annuals.
- Place shade-tolerant ferns, begonias, or trailing plants on lower shelves where light is reduced.
- Ensure adequate ventilation in warm weather — unzip or prop the front panel open on hot days.
- Style pots consistently — a mix of terracotta, matte ceramic, and small woven basket pots looks curated rather than random.
- Add a small battery-operated LED grow light on the lower shelf during winter months to support plants through shorter days.
- Clean the clear panel cover each spring — dirt and algae reduce light transmission significantly over a season.
I’ve seen greenhouse shelving units transform a basic patio into a year-round plant sanctuary. The protection they offer means you can grow a much wider variety of plants than the local climate might otherwise allow.
Common Outdoor Plant Shelf Mistakes to Avoid
These easy-to-fix mistakes are responsible for most outdoor plant shelf displays falling short of their potential:
- Overcrowding every shelf. Packing pots together until no surface is visible reads as cluttered rather than lush. Leave breathing room between plants — the negative space actually makes each plant look better.
- Using indoor pots outdoors. Many beautiful ceramic pots are not frost-resistant. Check that any pot used permanently outdoors is rated for your climate zone.
- Ignoring drainage. Every pot on every outdoor shelf needs a drainage hole. Water pooling in pots leads to root rot almost every time.
- Choosing all the same plant height. A shelf of identically sized upright plants in identical pots looks flat and uninteresting. Vary plant heights, textures, and leaf shapes deliberately.
- Forgetting about weight limits. Wall-mounted shelves have load limits. Always use appropriate fixings and check that your wall can support the combined weight of shelves, pots, soil, and plants.
- Neglecting sun and shade requirements. Placing sun-loving plants in a shaded corner — or shade-loving plants in full afternoon sun — leads to struggling, unhealthy displays. Match plants to the actual light conditions of each shelf position.
Outdoor Plant Shelf Style Selector
| Patio Style | Best Shelf Type | Best Plant Choice | Key Finish |
|---|---|---|---|
| Contemporary | Black metal tiered stand or floating timber shelves | Snake plant, pothos, monstera | Matte black or charcoal |
| Cottage Garden | Reclaimed ladder shelf or wooden crate wall | Herbs, sweet peas, trailing ivy | Natural timber or heritage paint |
| Boho/Eclectic | Peg rail or hanging crate display | Trailing succulents, string of pearls | Jute rope, terracotta, warm tones |
| Mediterranean | Terracotta pot tower or bamboo divider | Lavender, rosemary, geraniums | Natural terracotta and warm stone |
| Minimalist | Wall-mounted floating shelves (staggered) | Succulents, small ferns, air plants | White or pale timber, clean lines |
| Small Balcony | Corner etagere or wall pocket planter | Herbs, compact trailing plants | Any — prioritize slim footprint |
| Farmhouse | Wooden crate stack or greenhouse unit | Herbs, seasonal annuals, vegetables | Whitewash, natural wood, black iron |
Frequently Asked Questions
What is the best material for outdoor plant shelves? Powder-coated steel, aluminum, teak, cedar, and pressure-treated timber are the most durable options for outdoor use. Whatever material you choose, always apply a waterproof finish or confirm the material is rated for outdoor exposure. Untreated timber and standard particleboard will deteriorate quickly in rain and humidity.
How do I style outdoor plant shelves to look designer? Three principles make the biggest difference: vary plant heights within each shelf, limit your pot color palette to two or three complementary tones, and include at least one trailing plant per shelf to add movement and flow. Odd numbers of pots per shelf (three or five) also create a more natural, styled look than even numbers.
Can I use outdoor plant shelves on a small apartment balcony? Absolutely — outdoor plant shelves are often at their most impactful in small balcony spaces. Corner etageres, wall pocket planters, and leaning ladder shelves all deliver maximum planting capacity in minimal floor space. A single well-styled ladder shelf can hold twelve to fifteen plants while occupying less than two square feet of balcony floor.
How often do I need to water plants on outdoor shelves? More frequently than ground-planted or large pot plants. Elevated shelves expose pots to more air circulation, which dries the growing medium faster. In warm summer weather, daily watering may be needed for smaller pots. Always check the top inch of soil before watering — if it is still moist, wait another day.
What plants work best on outdoor shelves in full sun? Herbs (rosemary, thyme, basil, oregano), succulents and cacti, lavender, pelargoniums (geraniums), petunias, and most trailing annuals thrive in full sun positions. Choose pots with good drainage and use a free-draining potting mix blended with grit or perlite to prevent waterlogging in heavy rain.
Do I need to bring outdoor plant shelves inside in winter? It depends on the material and your climate. Metal and hardwood shelves generally tolerate winter weather well with appropriate covers or treatment. Tender plants on the shelves will need protection — either moving them inside, covering with fleece, or switching to frost-hardy varieties in late autumn. Terracotta pots should be brought indoors in areas with freezing winters, as they can crack in frost.
Final Thoughts
There is something genuinely satisfying about a patio wall that used to be bare and now overflows with greenery, texture, and life. It does not require a big budget or a large space — it just requires a little intention and the right shelving to display what you grow.
These outdoor plant shelf ideas range from quick weekend projects to longer-term investments, but every single one of them delivers results that go far beyond the time and money involved. Pick the one that fits your space, your style, and your plant collection — and then style it with confidence. I have seen even the simplest ladder shelf, thoughtfully planted, completely transform how a patio feels to be in.
Save this guide to your Pinterest boards, share it with a friend planning a balcony or patio refresh, and revisit it each season as your outdoor plant collection grows.

Indy Santos is a passionate interior styling specialist and home living enthusiast with a focus on contemporary decor, smart space planning, and affordable design inspiration. At Inspired Homex, she provides readers with fresh decorating concepts, actionable advice, and professional guidance to create comfortable, elegant, and well-organized homes that reflect their personal style.