
Introduction
The backsplash is one of those kitchen details that most people think about last, but it’s often what gives a kitchen its entire personality. In a cottage-style kitchen, the right cottage kitchen backsplash can take a space from plain and functional to genuinely warm and character-filled, almost overnight. It’s the element that sets the mood, ties the cabinetry and countertops together, and makes a kitchen feel like it belongs to someone rather than just being a room with appliances.
What I love about cottage backsplash design specifically is how much room there is for charm. You’re not locked into sleek or minimalist here. This style welcomes handmade-looking tile, vintage patterns, painted brick, shiplap, and plenty of beautiful imperfection. The whole point is a kitchen that feels cozy, lived-in, and full of warmth the moment you walk in.
In this guide, I’m sharing 12 cottage kitchen backsplash ideas, from budget-friendly painted options to classic tile combinations that bring genuine character to your cooking space.
Key Takeaways
- Cottage backsplashes embrace texture, handmade-looking finishes, and soft color palettes
- White subway tile is a timeless cottage classic, especially in handmade or textured variations
- Painted brick brings rustic warmth even in kitchens that don’t have original brick walls
- Beadboard and shiplap panels offer a budget-friendly alternative to tile
- Vintage-patterned encaustic tiles add personality without requiring an entire kitchen overhaul
- Grout color matters enormously, warm-toned grout looks more cottage-authentic than stark white
- Budget-friendly peel-and-stick options are worth considering for rental kitchens
Why Cottage Backsplash Style Works So Well
The cottage kitchen aesthetic is built on the idea of a kitchen that feels genuinely used, loved, and layered over time, rather than showroom-perfect. A backsplash that leans into handmade texture, soft color, or vintage pattern does exactly that. It makes the kitchen feel like it has a story.
In my experience, the backsplash is also where most cottage kitchen renovations deliver the biggest visual impact for the cost. It’s a relatively small surface area compared to flooring or cabinetry, but because it sits at eye level and gets framed by your countertops and cabinets, it gets more visual attention per square foot than almost anything else in the room.
Idea 1: Classic White Subway Tile
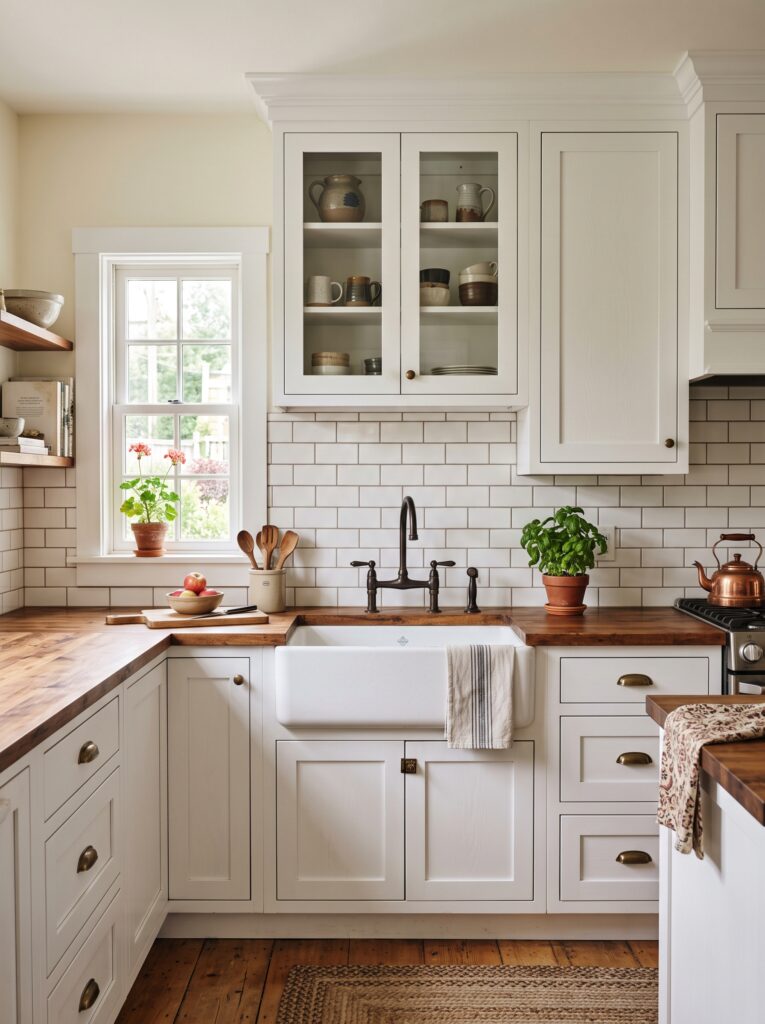
Classic white subway tile is the most enduring cottage kitchen backsplash choice for a reason. Homeowners love it because it works with virtually any cabinetry color and never feels dated. It’s especially beautiful with warm grout tones, creating a soft, handmade quality that mass-produced tiles sometimes lose.
Key Elements:
- White subway tile, ideally with a slightly irregular surface
- Warm gray or cream-toned grout rather than stark white
- White or cream shaker cabinets
- A farmhouse or apron-front sink
- Warm wood or marble countertops
How to Style It:
- Choose subway tile with a slightly wavy or handmade surface for authenticity over machine-perfect tiles.
- Select a warm gray or cream grout color rather than bright white for a softer, more cottage-appropriate look.
- Install in a classic horizontal running bond pattern for the most timeless result.
- Pair with white or cream shaker cabinets to reinforce the cottage character.
- Add a farmhouse sink below to complete the classic cottage kitchen feel.
Idea 2: Painted Beadboard Backsplash
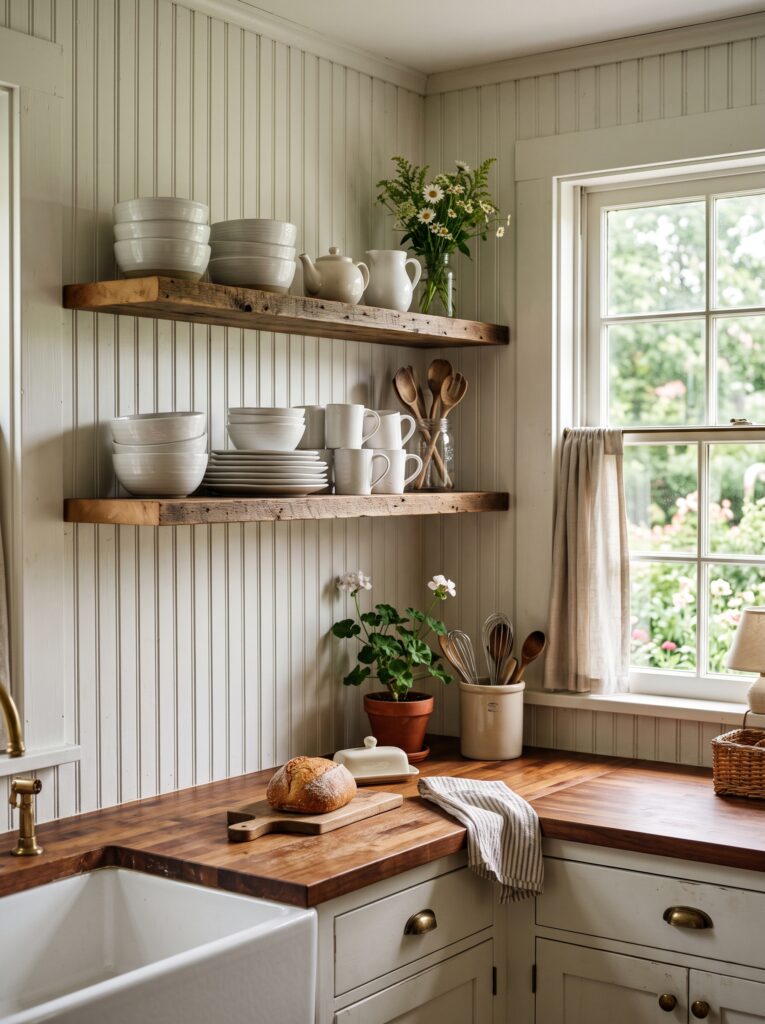
Beadboard is one of the most budget-friendly, instantly cottage-feeling backsplash options available. Painted white and sealed, it brings a classic, paneled character to any kitchen. It’s loved for being both a DIY-friendly project and a genuinely charming design choice, working especially well in cottage or farmhouse kitchens.
Key Elements:
- Beadboard panels cut to fit the backsplash area
- White or cream paint with a semi-gloss finish for moisture resistance
- A clear sealant along the countertop edge for protection
- Open shelving or simple upper cabinets as the backdrop
- Warm wood or butcher block countertops for contrast
How to Style It:
- Cut beadboard panels to fit your backsplash height and width precisely.
- Install using construction adhesive or panel nails, ensuring panels are level.
- Caulk along the countertop edge for a moisture-resistant seal.
- Paint in a white or soft cream semi-gloss paint for both beauty and durability.
- Add open shelving above to style with white ceramics or cottage accessories.
A helpful styling trick is to choose a semi-gloss rather than a flat paint finish for beadboard backsplashes, since semi-gloss is much easier to wipe clean in a working kitchen environment.
Idea 3: Vintage Encaustic Cement Tile
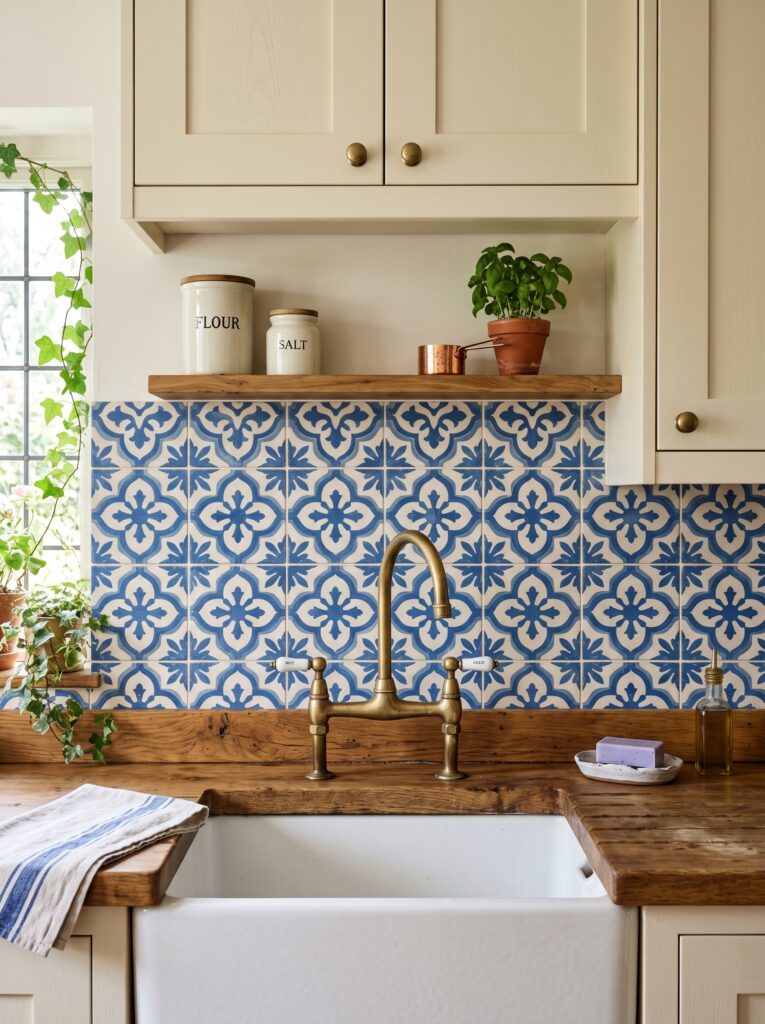
Encaustic cement tiles bring a genuinely artisan, old-world quality that few other backsplash materials can replicate. Their handmade look, slight surface variation, and rich patterns feel perfectly at home in cottage kitchens. It’s loved for being an instant conversation piece, working especially well as a feature backsplash behind the stove.
Key Elements:
- Encaustic cement tiles in a geometric or floral pattern
- Cream or soft white cabinetry
- A brass or copper faucet
- Minimal grout lines for a cleaner pattern look
- A sealer applied to protect the porous tile surface
How to Style It:
- Choose a pattern that complements your kitchen’s existing color palette, typically with cream, blue, or terracotta tones.
- Apply encaustic tiles to the primary focal wall, like behind the stove or sink, rather than the entire kitchen.
- Seal the tile surface thoroughly before grouting and again after, since encaustic tile is porous.
- Use a minimal grout line for the clearest pattern visibility.
- Pair with cream or soft white cabinetry and brass hardware to enhance the old-world cottage mood.
Idea 4: Shiplap Backsplash
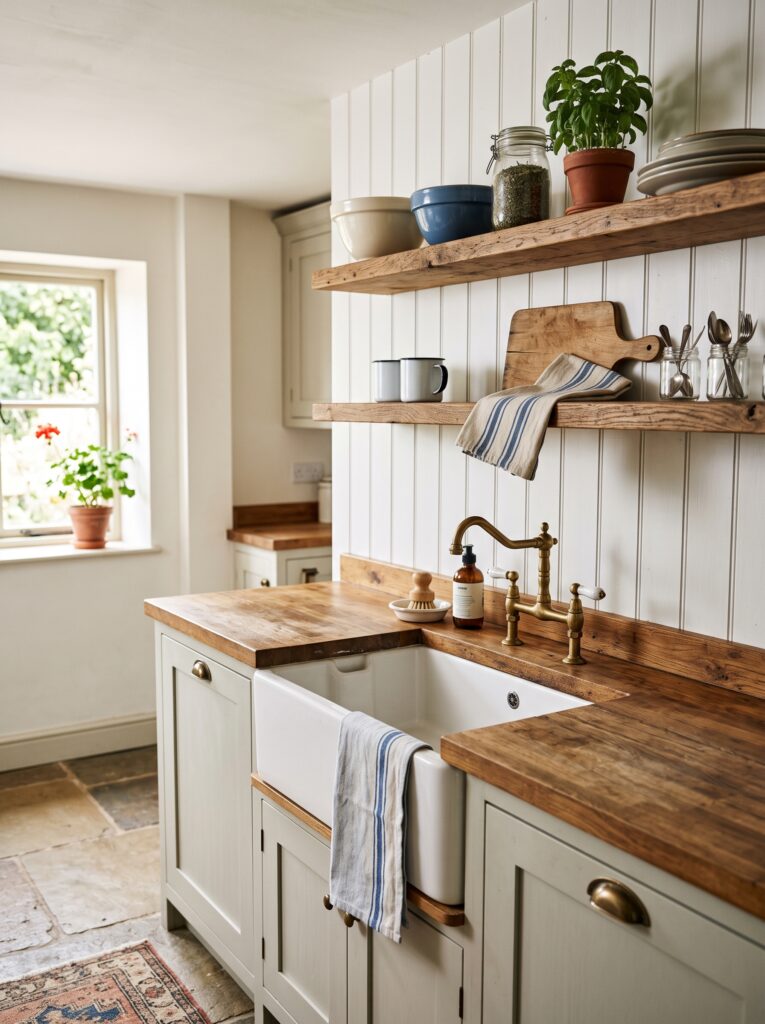
Shiplap as a kitchen backsplash brings the same warmth it delivers in living rooms and bedrooms, with the added bonus of genuine cottage character. It’s loved for its simplicity and the cozy, horizontal movement it creates on the wall. Sealed properly, it’s practical enough to handle everyday kitchen splashes.
Key Elements:
- White or cream painted shiplap panels
- A clear poly sealant for moisture protection
- Open wood shelving or simple upper cabinets
- A farmhouse sink below
- Warm wood countertops or butcher block
How to Style It:
- Install shiplap panels horizontally across the backsplash area.
- Seal all edges and surfaces thoroughly with a clear, waterproof sealant.
- Apply caulk along countertop edges for an additional moisture barrier.
- Paint in a soft white or cream with a semi-gloss finish for easy cleaning.
- Install open wood shelving above to style with everyday ceramic pieces and small plants.
Idea 5: Handmade Zellige Tile
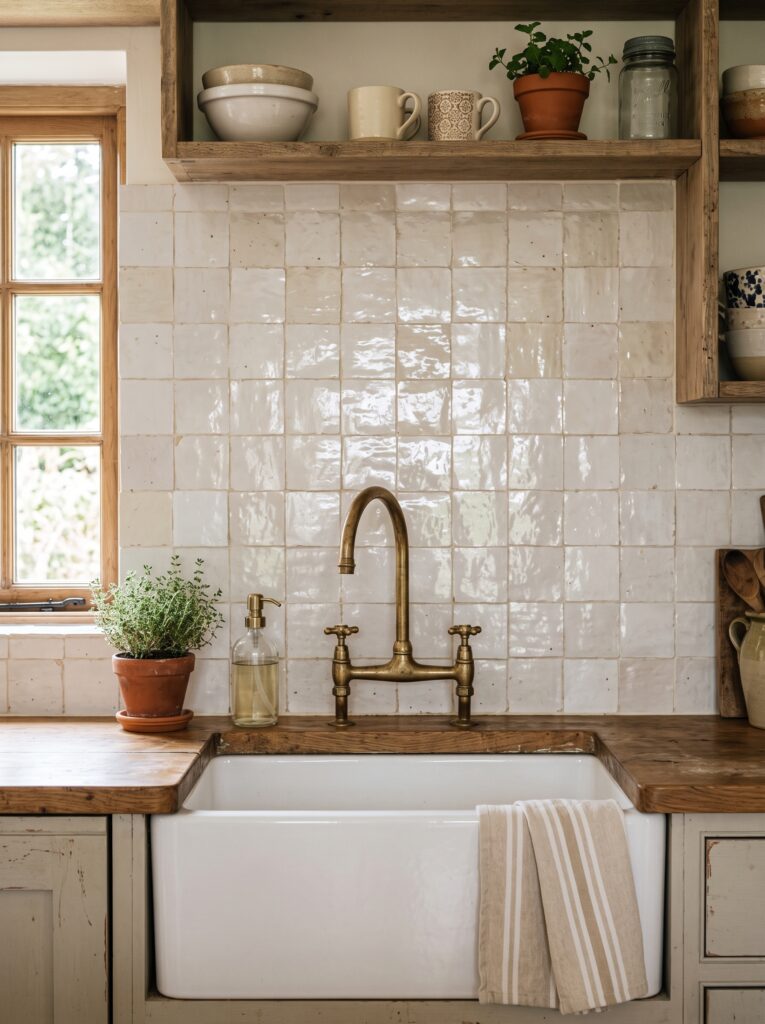
Zellige is a handmade Moroccan tile with a slightly uneven, reflective surface that catches light in the most beautiful way. No two tiles are exactly alike, which gives the backsplash a genuinely artisan, collected quality. It’s loved for feeling luxurious while still fitting perfectly into a warm, cozy cottage kitchen.
Key Elements:
- White or cream handmade zellige tile
- A farmhouse or apron sink below
- Brass or gold fixtures
- Soft natural lighting to highlight the tile’s surface variation
- A simple, minimal grout color to let the tile movement stand out
How to Style It:
- Choose a zellige tile in a soft white or cream tone for the most versatile cottage application.
- Install with minimal grout lines to keep the focus on the tile’s natural surface variation.
- Use a warm-toned, cream or beige grout rather than stark white.
- Pair with brass fixtures and hardware to enhance the artisan warmth of the tile.
- Allow natural light to hit the wall directly, since zellige tile’s reflective surface is most beautiful in natural light.
In my experience, zellige tile looks significantly better in person than in photos because the light plays off its surface differently every hour of the day, and that living quality is what makes cottage kitchens feel genuinely special.
Idea 6: Painted Brick Backsplash
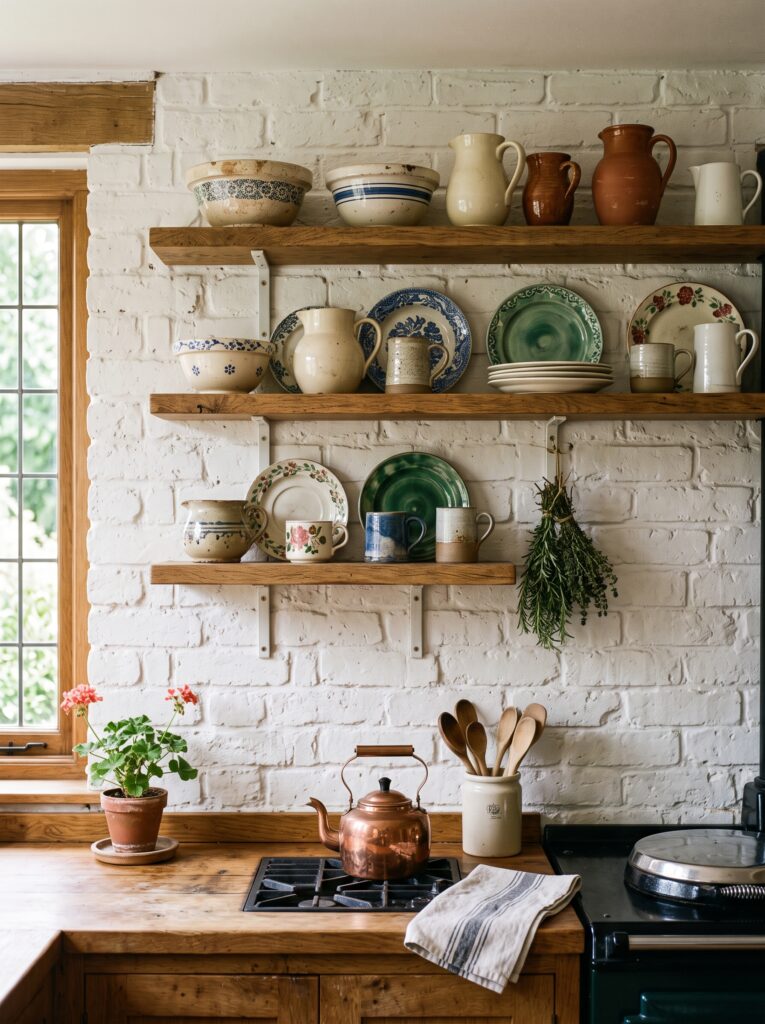
Painted brick brings genuine architectural character that you simply can’t fake with tile alone. Whether your kitchen has original brick or you install thin brick veneer, the texture adds warmth and visual depth that’s deeply cottage in spirit. It’s loved for its rustic, layered quality.
Key Elements:
- Original brick or thin brick veneer tiles
- White or limewash-style paint for a weathered, cottage effect
- Open shelving above for display and storage
- Vintage ceramic pieces for styling
- A warm wood countertop for material contrast
How to Style It:
- If you don’t have existing brick, install thin brick veneer tiles over the backsplash area.
- Apply white paint or a limewash product that allows the brick texture to show through.
- Use a dry-brush technique for a more weathered, authentic white-washed look.
- Seal the surface for moisture resistance near the sink and stove.
- Style the surrounding kitchen with warm wood tones and vintage ceramics to complement the rustic backdrop.
Idea 7: Sage Green Subway Tile
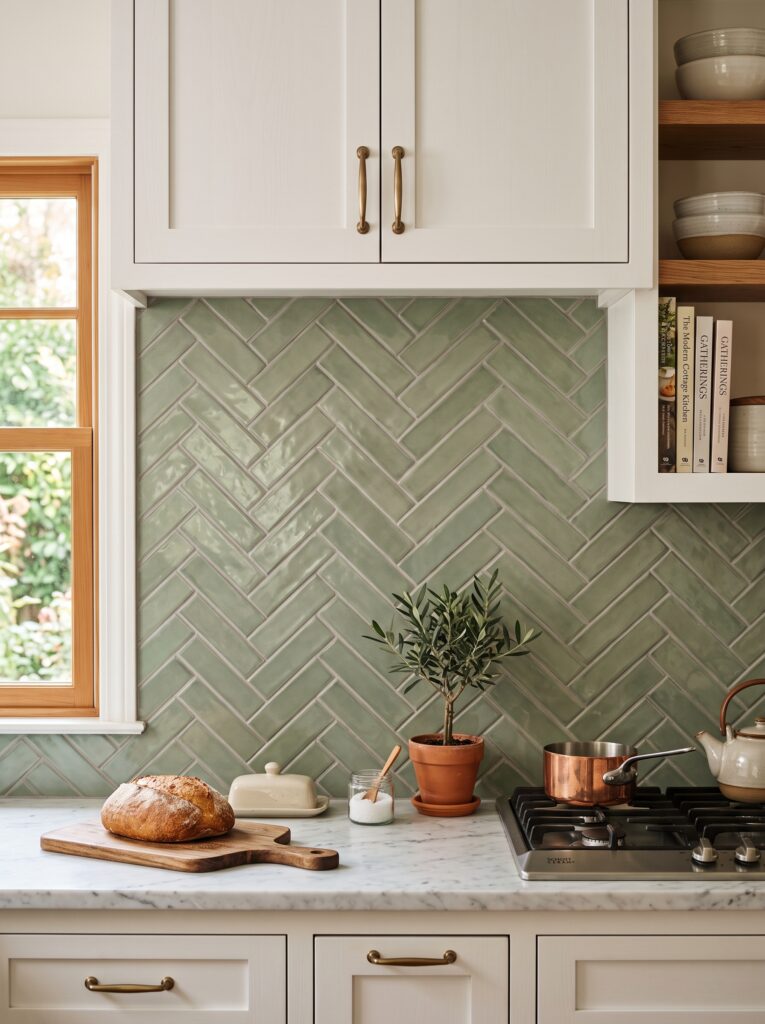
Swapping classic white subway tile for a soft sage green version introduces color and personality while maintaining the same cottage-friendly, low-key elegance. It’s loved for feeling both fresh and timeless, and it works especially beautifully in kitchens with white cabinetry, creating a calm, nature-inspired mood.
Key Elements:
- Sage green subway tile
- A herringbone or classic running bond pattern
- White or cream shaker cabinets
- A white or marble-look countertop
- Brass or gold hardware
How to Style It:
- Choose a muted, soft sage green rather than a bright or saturated green tile.
- Select a herringbone pattern for added visual interest over the standard horizontal lay.
- Pair with white or cream cabinetry to keep the sage tile as the clear color accent.
- Use a cream or warm-toned grout rather than white to soften the overall look.
- Add brass hardware and faucets to warm up the cooler green tones.
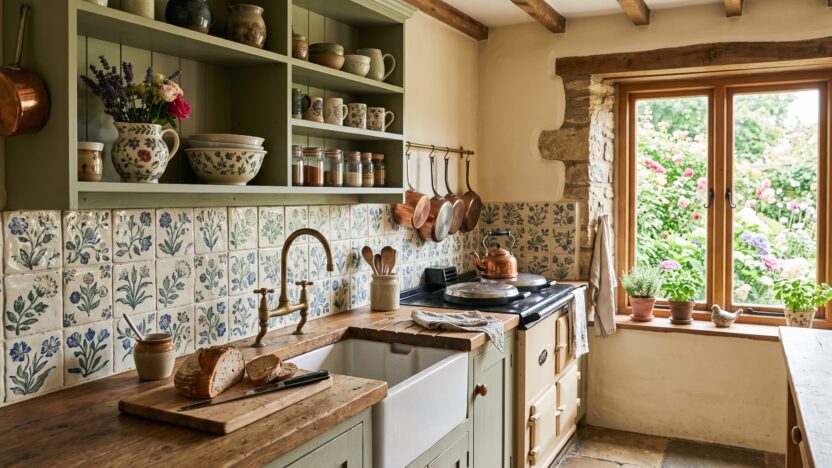
Idea 8: Blue and White Dutch Tile
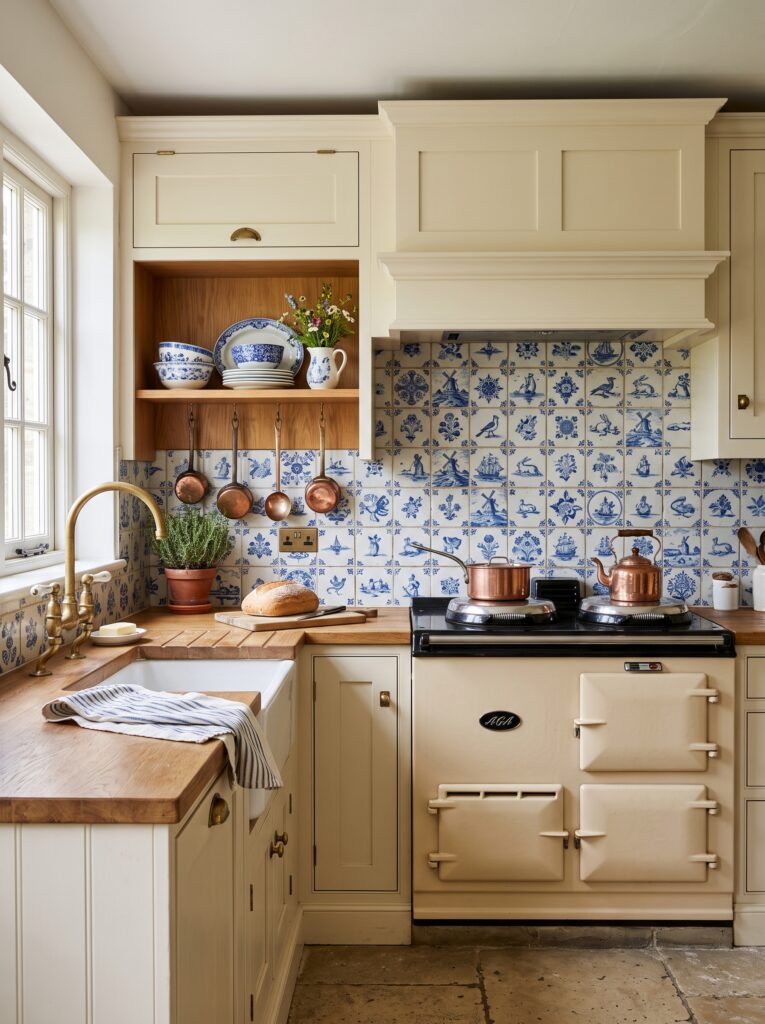
Delft-inspired blue and white painted tiles bring a distinctly European, storybook cottage quality to any kitchen. Each tile often features its own small painted scene or motif, making the backsplash feel genuinely hand-crafted and collected over time. It’s loved for its visual warmth and charm.
Key Elements:
- Blue and white hand-painted or Delft-style tiles
- Cream or soft white cabinets
- Brass or copper hardware and fixtures
- Warm wood countertops or open shelving
- A focused placement behind the stove or sink as a feature wall
How to Style It:
- Use Delft-style tiles as a feature backsplash behind the stove rather than throughout the entire kitchen.
- Choose cream or soft white cabinetry to let the blue and white tile be the clear visual star.
- Pair with brass fixtures and warm wood accents for a cohesive European cottage mood.
- Use a minimal cream grout to avoid harsh lines breaking up the tile’s pattern story.
- Keep surrounding kitchen styling simple so the painted tiles remain the focal point.
Idea 9: Terracotta Tile Backsplash
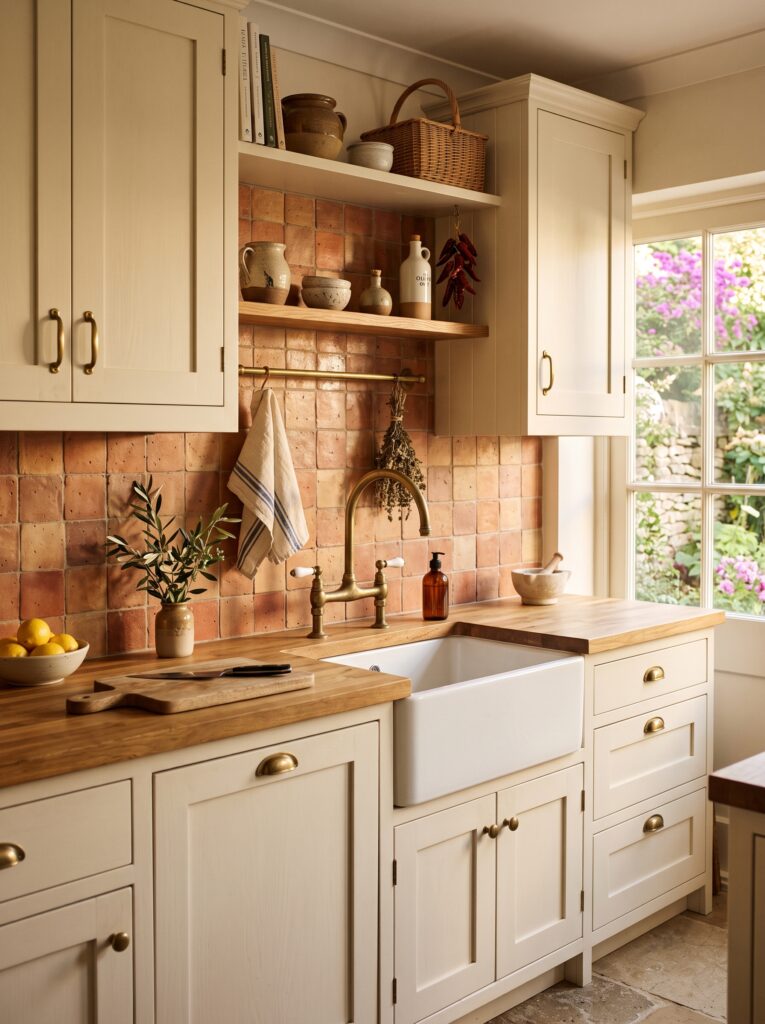
Terracotta tile brings an earthy, sun-warmed quality to cottage kitchens, especially those with Mediterranean or Tuscan-inspired design elements. The warm reddish-orange tones work beautifully against cream or white cabinets, creating a kitchen that feels genuinely warm and alive.
Key Elements:
- Terracotta tile in square or hexagonal format
- Cream or white cabinetry
- Brass or copper fixtures
- Warm-toned grout in cream or tan
- A sealant to protect the porous tile surface
How to Style It:
- Choose unsealed terracotta tile for an authentic, matte, earthy finish.
- Apply a penetrating sealant before grouting to protect the porous surface.
- Use a warm cream or tan grout to complement the tile’s earthy tones.
- Pair with cream cabinetry and brass fixtures to enhance the warm, Mediterranean mood.
- Reseal the tile annually to maintain its appearance and protect against moisture.
Idea 10: Vintage Mirror Tile Accent
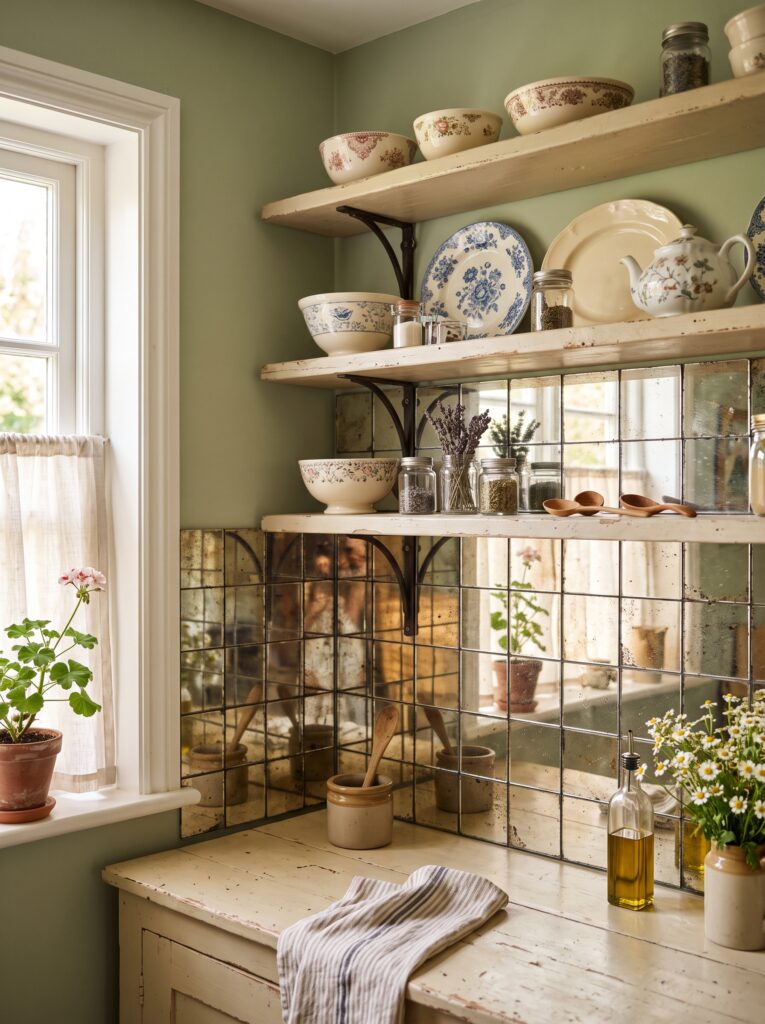
Mirror tiles used as a backsplash accent bring brightness and a delicate, slightly vintage quality to small cottage kitchens. The slight antiquing on vintage-style mirror tiles makes them feel far more charming than standard mirror, adding light without a modern or glossy look.
Key Elements:
- Vintage-style or antiqued mirror tiles
- Open shelving above for display
- Warm-toned natural light
- Minimal grout for the cleanest mirror look
- A small, focused placement rather than the full kitchen
How to Style It:
- Choose antiqued mirror tiles rather than standard clear mirror for a vintage, cottage-appropriate look.
- Apply as an accent section rather than the entire backsplash.
- Install behind open shelving where the reflected light is most visible and beautiful.
- Use minimal grout or a clear grout to keep the mirror surface as continuous as possible.
- Style the shelving above with warm-toned ceramics that will catch beautifully in the mirror’s reflection.
Idea 11: Whitewashed Peel-and-Stick Option
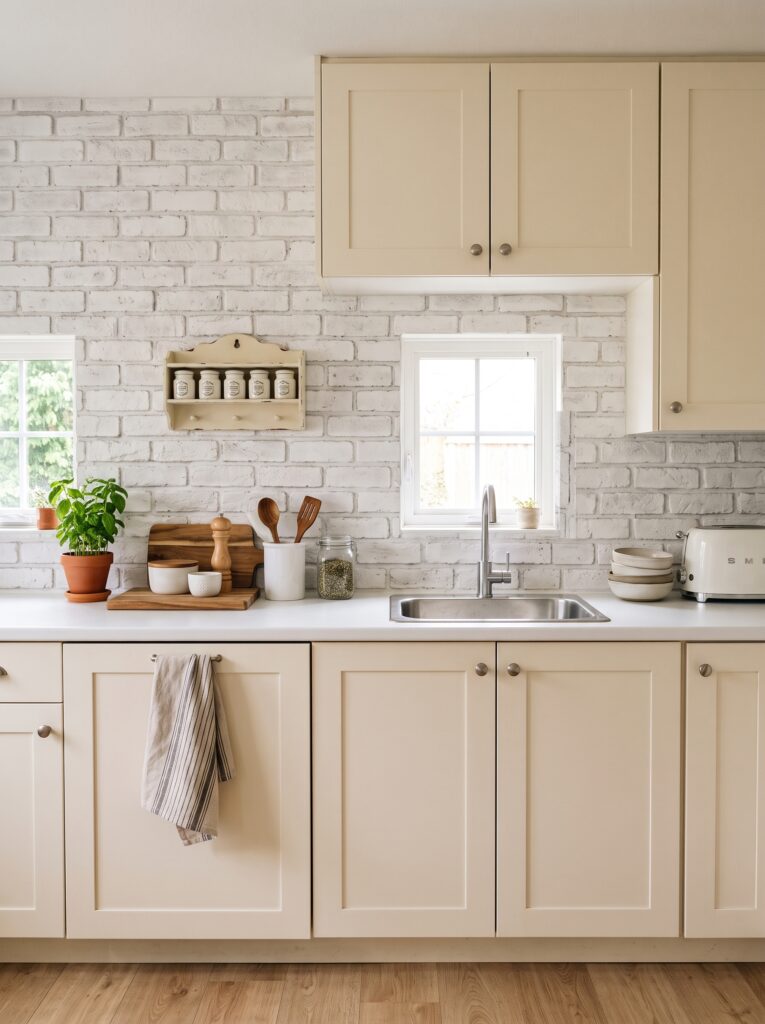
For renters or anyone not ready to commit to permanent tile, high-quality peel-and-stick backsplash panels in cottage-appropriate patterns offer a genuinely beautiful alternative. Modern versions are far more realistic than older peel-and-stick options, and some even mimic the slight surface variation of handmade tile.
Key Elements:
- High-quality peel-and-stick backsplash panels
- A whitewashed brick or subway tile pattern
- A clean, smooth wall surface for application
- A utility knife for trimming edges
- Existing cream or white cabinetry as the backdrop
How to Style It:
- Choose a peel-and-stick panel with a textured, slightly irregular surface for the most realistic look.
- Clean and dry the wall surface thoroughly before application.
- Apply from one corner, smoothing carefully to prevent bubbles.
- Trim edges neatly with a utility knife around outlets and countertop edges.
- Remove carefully at move-out following product-specific removal instructions.
Idea 12: Natural Stone Mosaic Backsplash
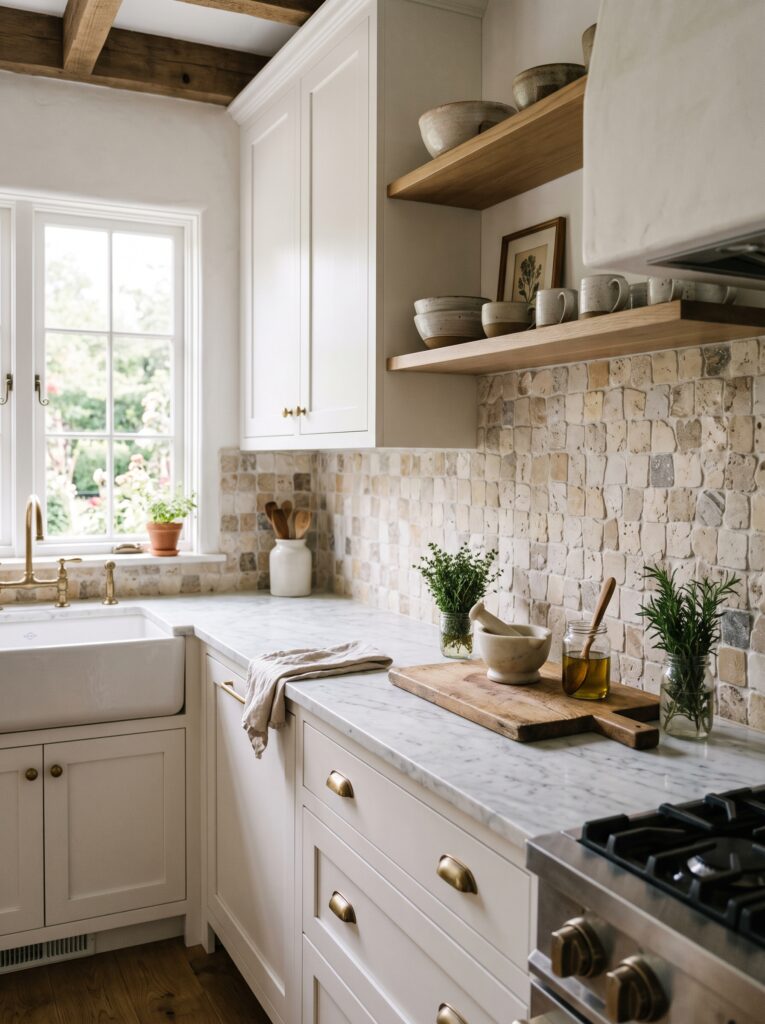
Natural stone mosaic tiles bring an organic, layered richness to cottage kitchens that fired ceramic tiles can rarely match. The variation in each stone’s color and texture creates a genuinely handcrafted, nature-connected backdrop that fits perfectly within cottage style’s emphasis on natural materials.
Key Elements:
- Natural stone mosaic tile in soft cream, tan, or sage tones
- White or cream cabinetry
- A marble or stone countertop for material cohesion
- A clear stone sealant for protection
- Warm-toned grout to complement the stone’s natural tones
How to Style It:
- Choose a stone mosaic tile in a color palette that complements your countertop and cabinetry.
- Apply a penetrating stone sealant before grouting to protect the porous surface.
- Use a warm-toned grout that blends naturally with the stone’s color variation.
- Pair with white or cream cabinetry and a coordinating stone countertop for material cohesion.
- Reseal the stone annually to maintain protection against kitchen moisture and grease.
Cottage Kitchen Backsplash Material Guide
| Backsplash Material | Cost Range | Durability | Easiest Pairing | Best For |
|---|---|---|---|---|
| White Subway Tile | Low–Moderate | High | Shaker cabinets | Classic cottage kitchens |
| Beadboard | Low | Moderate | Open shelving | Budget-friendly DIY |
| Encaustic Cement Tile | Moderate–High | High | Cream cabinets | European cottage style |
| Zellige Tile | High | High | Brass fixtures | Artisan cottage kitchens |
| Painted Brick | Low–Moderate | High | Wood shelving | Rustic cottage kitchens |
| Sage Green Subway | Low–Moderate | High | White cabinetry | Soft, nature-inspired style |
| Peel-and-Stick | Very Low | Low–Moderate | Any | Rental kitchens |
Common Decorating Mistakes to Avoid
- Choosing too bold a pattern for the entire kitchen. Use statement tiles as a feature section behind the stove or sink, rather than across every wall.
- Skipping sealant on porous tiles. Terracotta, encaustic, and natural stone tiles all require proper sealing to prevent staining and moisture damage.
- Using stark white grout. In cottage kitchens, a warm cream or gray grout looks far more authentic and charming than bright white.
- Ignoring the countertop relationship. Your backsplash and countertop need to complement each other, not compete for visual dominance.
- Choosing tile based only on photos. Always order samples and view them in your own kitchen’s light before committing to a full installation.
- Overlooking maintenance requirements. Some of the most beautiful cottage tiles require more upkeep than standard ceramic options.
Final Thoughts
A cottage kitchen backsplash is one of those upgrades that touches every single cooking session, morning coffee, and family gathering that happens in that room. The right choice brings warmth, character, and genuine charm into a space that deserves to feel as good as it looks.
I’ve seen how simple decorating changes like these can completely transform how a home feels without requiring a major renovation, and a backsplash update is one of the clearest examples. Start with just one idea from this list, whether it’s a peel-and-stick panel for a rental or a set of beautiful encaustic tiles for a permanent upgrade, and let your kitchen’s personality begin to take shape.
Save this article to your Pinterest board for your next kitchen project, and share it with anyone who’s been dreaming of a warmer, more character-filled cooking space.

Indy Santos is a passionate interior styling specialist and home living enthusiast with a focus on contemporary decor, smart space planning, and affordable design inspiration. At Inspired Homex, she provides readers with fresh decorating concepts, actionable advice, and professional guidance to create comfortable, elegant, and well-organized homes that reflect their personal style.